Review of Rimmel London Day 2 Night Mascara

Rimmel London's Glam'Eyes Day 2 Night mascara promises to deliver length and volume to your lashes with one tube. I purchased this mascara to try something new after finding out that I love the original Glam'Eyes which made my blue eyes pop after a few swipes in black. The Day 2 Night gives you the option of choosing to either lengthen or add volume to your lashes.

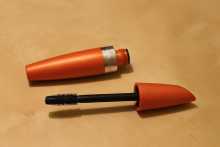
At this point you are most likely wondering how one tube can give you two different results depending on your makeup goal at the time. Rimmel achieved this by putting together a brush and tube that takes off a certain amount of mascara to fit the type of lashes you desire. On the top part of the tube Rimmel lists the volume choice in black and white at the bottom of the length area which is colored in pink and white. You pull the tube from whichever lash type you want to achieve with the Day 2 Night mascara.


I first applied the volume and thought that it added an ever so slight length to my lashes. Later on in the day I tired to lengthen my lashes. In my opinion the length worked better than the volume but I have read reviews where other people love this mascara. One of my pet peeves about it is that the brush seems to creep out of my hands and I find my face marked with think, black mascara. Overall, I'm satisfied with the results but I think I'm going to switch back to my regular Glam'Eyes. I would give this mascara a rating of 6 one a scale from 1 to 10.


What Your Lipstick Shade Of Choice Says About Your Personality

Have you ever taken a few minutes to think about what the color of your lipstick says about your personality? I never thought about the correlation between color psychology and makeup until I came across and an article on iVillage.com titled "What Does Your Lipstick Shade Say About You" written by Dawn Papandrea. I read on to see if my lipstick shades of choice actually represented my personality.


I used to wear mostly pink but lately, since dying my hair blondish red hue, I have gravitated toward corals and reds. The shade I wear depends on my mood and because of that fact, I think there's gotta be some relation between your lipstick color and what you display to the world.

The iVillage article agreed that red is color reserved for individuals who like to stand out. I have to say I agree with this one because I only started wearing red after losing 20 pounds of baby weight. I find that I tend to wear a vibrant red when I'm feeling happy and in control of my life.


My other shade of choice says that I like to have a good time if I'm wearing a brighter version of the shade. I think this is true and matches the red lipstick wearer except that I'm feeling quirky when I put on this brilliant shade. The lighter coral color indicates that I enjoy wearing this color when I'm in the mood to have fun but in a more muted environment such as at a lunch with friends.


Shades that I don't tend to wear include purple, neutral shades and pink. I suppose fact in of itself says a lot about my personality. Purple lipstick wearers like to give off a mysterious vibe that invites friends and family to keep on guessing about them. Professionals such as doctors, lawyers and executive secretaries find themselves drawn toward neutral lipstick when at the office because they know what they're after and don't like to stand out in an uninviting way. I have concluded that lipstick color can represent personality but may not always paint an accurate picture because as soon as the professional leaves the office for a date night she swipes her neutral shade for a vibrant purple.


Pink Lip Gloss – How I Love Thee!

I don’t really like the color pink – except when it comes to lip products. I pretty much adore pink lipstick and lip gloss. I tend towards cool-toned and milky pinks as that best suits my skin tone.  If you were to look into my makeup case right now, you would probably find no less than 10 pink lip glosses! Here are my two very favorite pink lip glosses.  

MAC Underage Lipglass

MAC Underage Lipglass is a creamy soft pink color with a light shimmer. The color is not a bright or noticeable pink. In fact, I would consider it a nude pink color. It’s easily worn either over lipstick or on its own. My lips are not very pigmented so the color was quite accurate. Those with pigmented lips may have a different experience. As with all MAC Lipglasses, the staying power is amazing!

NARS Turkish Delight Lip Gloss

NARS Turkish Delight Lip Gloss gained popularity when it was rumored to be what Kim Kardashian uses on her lips. In my opinion, NARS Turkish Delight Lip Gloss is the holy grail. It’s a bit more expensive than the other ones that I’ve used, $24 a pop, but it is the perfect shiny, milky baby pink with shimmer but not sparkle. It’s an opaque lip gloss and while it is long lasting, I usually have to reapply at least once or twice per day. One thing that makes it stand out is that it isn’t sticky. I also find the vanilla scent of the lip gloss to be pleasant.

How to Determine Which Haircut Works Best for Your Face Shape

You sigh as you realized you looked at another page filled with cute spring hairstyles. The article showed you that any haircut would suit an oval face shape and that heart face shapes look best when sporting a chin-length blog. The information is all well and great but you don't know what your face shape is. I would get upset every time I read yet another article that showed dozens of ways to style and cut hair to suit a particular face shape. I didn't know my own much less how to figure it out. Ladies, fret no further because I scoured the Internet until I found a method to determine my face shape. Which, by the way, is oval.


Things You'll Need:

  • Mirror
  • Measuring Tape
  • Paper
  • Pencil


  1. Figure out which mirror you want to use to measure your face and gather together your tape measure, piece of paper and pencil.
  2. Measure your cheekbones by placing the end of your tape measure a little ways past the outer corner of your eye. From here you can start measuring your face shape. Form a straight line with your measuring tape by laying it across the bridge of your nose to right past the outer corner of the eye where you're not already holding the measuring tape. Check to see that the tape measure is sitting on top of your cheekbones for the purposes of getting an accurate reading. Write down the measurement after you read the numbers you see on it.
  3. Place the measuring tape on the side of your jaw closest to your ear and run it along your jaw until you reach the middle of your chin. Multiply that number by two and write down this number on your sheet of paper.
  4. Measure your forehead by placing the beginning of your measuring tape on the side of your forehead at the point you notice that's the widest between your hairline and eyebrows. Run the tape along your forehead until you reach the same spot on the other side of your head. Write down the number you see on your tape measure.
  5. Place the beginning of your measuring tape at the middle of your hairline. Measure the distance between your hairline and the top of your chin. Write down the number you see on the measuring tape onto your sheet of paper.


You're an oval if the length of your face equals out to one and a half times the width and lucky you if you have it because this face shape appears well-balanced to the human eye. You can wear all types of different hairstyles from the really short to the really long. Round faces are as long as they are wide and stylists recommend that you try haircuts that sit higher at the crown to help you balance out the width of your face. Think off center parts as one way to give yourself your best face forward. Oblong faces are longer than wide and styles that suit this face shape include those that fall between short and medium on the length scale. Add layers around your face to soften it's appearance and remember to steer away from very long hair. Heart-shaped faces display a narrow jawline with wide cheekbones. Chin-length bobs give your jaw a balanced appearance and you can pull off longer hair styles with ease. Square face shapes are as wide as they are long but they give off more of an angular shape than round faces do. Look to style your mane with short and medium length styles. You can also pull off wavy styles with this face shape. Wide cheekbones and a narrow forehead along with your jawline are the dominate features of a diamond face shape. You can pull off many hairstyles with this face type; similar as to the individual who has an oval face.


Welcome Spring 2012 with a Pretty Blush

This year pink has already ruled the makeup looks seen on the fashion runways of New York and beyond, along with nude, red and neon. I've been aware for quite some time that pink blush gives cheeks a healthy glow but what I didn't know is that for 2012, makeup artists have come up with a new way to make your face appear rosy and flushed. The combination blush look first appeared on the Ralph Lauren runway, sported by models done up by makeup artist Tom Pecheux. Pecheux's goal was to create a rosy glow that didn't appear flat under camera lights and, from what I've seen, he succeeded.

The correct way to wear the 2012 pink blush trend is to apply two layers of blush in different colors to your face. Makeup artists recommend building your blush look by swiping your cheeks with a pink and apricot blush, according to Allure magazine in an article titled “The 10 Makeup Colors You'll Want in 2012,” written by Elizabeth Siegel.

You can use either cream or powered blush to achieve the look that's hot for this spring and summer. Apply the apricot blush to the apples of your cheeks using a blush brush. Add the pink blush over top of the apricot blush and you're set. The combination of colors gives you a healthy glow throughout the warmer months. Two of the blushes you can make this combination work with are Revlon's Powder Blush in Pink Blush and Yves Saint Laurent Touche Blush – No. 7 Apricot.


Are you Cool or Warm Toned?

When choosing everything from makeup, hair color and clothing, skin tone is key. Learning whether you have warm or cool toned skin should help you determine what works for you. Some people are truly neutral and both are flattering, but for most, it’s either cool or warm toned. There are a few things to try that can help you figure out your skin tone.

Veins

Flip your wrist over and look at your veins. Do they appear green or do they look blue? If they are greenish, chances are that you are warm toned. Blue colored veins indicate cool toned skin.

Jewelry

Do you look better in gold or in tones of silver, white gold or platinum? It can be hard to tell, look at yourself in pictures or look in the mirror while holding the jewelry up against your skin. If you look best in gold, you are very likely warm toned. If you look good in silver or similar colored metals, that indicates that you are cool toned.

Clothing Colors

It’s hard to tell which clothing colors look good on you sometimes. But model different colors and you can see what works best. Take photos if you are unsure. Warm colors are ones such as yellow, orange and brown. If your skin is warm, these will bring out the best in your skin tone. If jewel tones such as purple and hunter green suit your skin, it is likely that you are cool toned.

Take the time to figure out your skin tone in order to look your very best!

Kiss Nail Art and Stencil Set Review

My mom got me a Kiss Nail Art and Stencil set because she knows how much I enjoy putting together a do-it-yourself manicure when I have the time. I wanted to try it the week between Christmas and New Year's but I was so busy that I waited until the week after. I plan to use it again for this week because I enjoy putting designs on my nails. I also endorse anything that helps make the process easier because I am so clumsy.

The set comes with two stencil sheets with designs including hearts, flowers and unique symbols. Black, silver and white are the nail polish colors that came in my set. I opted to try the black nail art polish on top of a pink polish for my first design. I picked out two flowers to stencil onto my nail in the event that the first one didn't work out. I applied two coats of Orly Nail Lacquer in Fabfuscia and waited until they were completely dry. Unlike with the application of rhinestones, where you place them on when the polish is still a bit wet, your nails have to be dry or else the stencils will stick and cause your polish to peel off. I placed the stencil on my thumb nail and went over it with the black polish. I peeled off the stencil only to see the material break. I decided that I would have to use the second one for my other thumb nail. I retrieved my second design option, another flower, and placed it onto my thumb. I went over my second thumb nail with the black nail art polish. The other stencil cracked when I went to removed it. However, the manicure was finished and all I had to do was wait for them to dry.


I liked the fact that the nail art brushes inside the nail art polishes are thin and easy to work with. I didn't enjoy how easy the stencils broke when I went to remove them. I don't think I'll purchase the stencils again except for the polish which is what 'chelle, a blogger for the blog Cosmetic Cupcake, also reported when she reviewed the nail polish stencil kit back in July of 2010. I will use the stencils I already have until they're for special occasions, when I don't want to visit a salon due to time or monetary reasons.


The Wonders of Dry Shampoo

I didn’t discover dry shampoo until approximately two years ago. Before that I don’t  remember ever seeing much about it. My hair is color treated and fine, but I have a ton of it and it grows very quickly. Before I discovered dry shampoo, I had never been able to go without washing my hair every day as it would just look limp and greasy. That wreaked havoc with my hair color, especially after I dyed my hair red. I started using dry shampoo and have been able to wash my hair every other day and use dry shampoo in between.

There are a multitude of dry shampoos on the market. My very favorite are any of the dry shampoos made my Batiste. Suave also has a new dry shampoo out that works well and is a few dollars cheaper. The standard directions are to hold it about six inches from the roots, spray and work it into the roots. Then just brush it through.

I’m not going to say that my hair looks exactly the same as when I just washed it as that just isn’t the case with my hair. But, it soaks up the oil and lets me pull it up into a ponytail and gives is a just-shampooed smell. Some women even use it on the day that they shampoo or before going out. Spraying some on the roots adds volume to hair that has gone flat by the end of the day.

I personally cannot go any longer than that without shampooing and probably wouldn’t want to anyway. For women with dry hair, perhaps use it for an extra day or two if you can get away with it. I credit dry shampoo with saving my hair color, as well as a lot of time that I would spend washing and blow drying my hair.

Baking Soda Beauty Facts

The Many Uses of a Common Household Product

Baking soda (Sodium bicarbonate) has many uses for food but did you know that you can use the product for beauty? I was aware that you could use the common household item as a toothpaste substitute if I found myself out of it but I didn't know that you could apply it to your beauty routine for pennies on the dollar. You can substitute baking soda for dry shampoo, zit zapping products, expensive skin exfoliation bottles and as a product buildup remover.

Apply baking soda as a hair cleaner, either as a dry shampoo or as a method to get rid of hair product buildup. Gather together your brush and the baking soda to make a baking soda dry shampoo. Add 1 to 3 teaspoons of baking soda to your brush (rinse the brush out afterward to keep the baking soda from getting everywhere.) Brush your hair with the product a couple of times, especially around the area where you part your hair and your good to go. Repeat the dry shampoo method to get rid of product buildup but add a wash and rinse with your regular shampoo and conditioner to complete the process.


Get rid of rough patches on your skin by scrubbing the area with baking soda and rinsing off the product once your finish. You can even apply the Sodium bicarbonate to a zit and let it sit overnight to clear up a pimple, according to Rona Berg in her book titled “Fast Beauty: 1,000 Quick Fixes” published by Workmen Publishing firm in 2005.


Protect Your Hair from Heat Damage


Ever worry about the damage you’re doing to your hair every time you go to use the straightener?

Your hair can only take being forced into straight submission for so long. Soon enough, it will start to rebel. Signs of this might be that your ends look frayed. Your hair may look frizzy when you first hop out of the shower now, whereas before, it looked healthy, shiny and squeaky clean. Yet, if you don’t take the time to straighten it, it just looks like a style-less poof ball, what’s a girl to do?

I present a solution. The Ion Company has a selection of hair products designed to battle this exact fear. This Christmas, I was surprised to find some of these products under the tree for me. Upon using them for the first time my hair looked visibly shinier and the hair follicles were flat. I couldn’t see any frayed ends.

These miracle products work in sync with each other. First use the leave in conditioner. Spray it on after you’ve stepped out of the shower and have had a chance to towel dry your hair. It should detangle your hair, eliminate static, help prevent future damage and leave it looking less frizzy. Then before you flat iron your hair and style it, rub in a dime sized amount of styling mousse through your towel dried tresses. This styling mousse will help protect your hair from heat damage now and in the future. The news of all is that both of these products can be had for less than five dollars apiece and can be found at your local Sally’s Beauty Supply. To locate your nearest one, go here.

Pages