How to create smoky eyes

How to create a sexy, smoky look

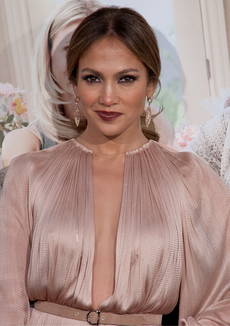
Smoky eyes are a look that isn’t going away any time soon. The reason why is that women love the sexy and enduring look it creates. The look makes them look mysterious, daring and seductive all at once. It is also an easy look to accomplish and makeup companies are making it easier by combining the colors we need for this in one eye shadow kits. If you are still trying to grasp this look, here are some pointers to guide you.

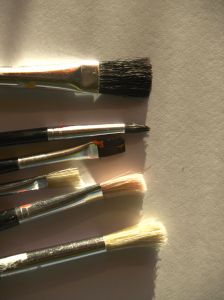
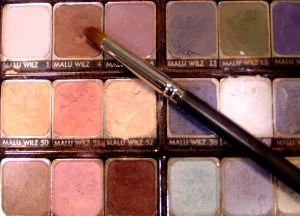
First, gather the supplies you will need. This will include a primer for your prep process, dark eyeliner, the eye shadows and dark mascara.

Your first step is prepping your eye area. You should do this because it will help the eye-shadows and liner to stay in place.  Plus, it will help camouflage any flaws you may have. This includes some fine lines and some discoloration one may have around their eyes. The primer should be put on lightly around the bottom area of the eye and along the side.

Step two is lining your eye lid. You should do this in a gently approach. You don’t want to apply it in a rough manner that will cause your eyes to become red or teary. You should trace the liner inside the upper lash line and completely under the bottom line. Once you are finished lining the eyes, you should smudge them a bit. You can do this with a cotton swab.

Step three is the act of applying your eye shadows.  You can begin by trying these example colors. Take a gunmetal type color and apply it on your lash line. Next, you can take a silver or pewter shade and apply over top of the gunmetal color on your lash line. Finish, by using a clean brush and applying a light shade over the rest of the eye lid, sweeping over the outer edge of your eyes.

Finally, step four is to apply your mascara. You should apply this to your lower and upper lashes. You should apply two coats to your upper lashes to help make them look fuller and longer. Presto, you are done and your eyes should have a smoky, as well as sexy look.


Tips on creating J. Lo’s cat eye look

Achieving the cat eye look with makeup

Do you love the look of cat eye makeup that is inspired by many celebrities such as J. Lo? Do you think this is a look that only professional makeup artists can accomplish? Do you wonder if it is a look that you can pull off for that next night of fun you have planned?

First, anyone who can apply eye makeup can accomplish this look. Yes, you can also become better at it, with practice. Second, anyone who is glamorous and daring will look good with a cat eye.

What do you need? You will need a pale pearly base cream eye shadow, a dark brown eye shadow, a white eyeliner, a dark eyeliner and classic black mascara. Begin by applying some of the pearly base cream eye shadow over the lids of your eyes. You can do this with your fingertips. Do this in a gentle motion. Now using your eye brush, apply the dark brown eye shadow to the crease of your eyelid. Apply as far as your brow line runs.

Take your dark eyeliner and draw a thin line on your top of your eyelid, close to your lashes. The goal is to fill in any gaps you see between your lashes. This line should be close to the lashes. Now you will begin to draw the wing that makes this look such a statement.

Continue with your dark eyeliner and bottom rim of your eyelid. Again, this should be a thin line from your nose to the center of your eye. At the corner, you will want to begin applying the liner a bit darker and then extend the line past your line and upward a tiny bit.

You will finish emphasizing the wing, by taking your white eyeliner and applying it above the dark liner on the top corner of your eyelid as you extend it out toward the wing line. Your last step is to add mascara to your lashes. You should apply two coats to make your lashes stand out more, as well as give them a bit more volume.


Beauty tips to fight off a wild night out

How to combat a wild night out or any type of night without sleep.

Did you party too hard last night? Did the baby keep you up all night? Did you fight with your hubby or significant other all night? Now that it is morning does your face show the signs? What can you do?

If you have nowhere to go, you can crawl back in bed, unless you still have a baby to care for in the morning. If you have somewhere to go and you don’t want to show the effects of the night, you can put down the coffee cup and begin your overhaul.

Now that you have caffeine the inside your body, it is time to put some on the outside of your body. Begin by placing a warm green tea bag onto each eye. This will help reduce puffiness. Keep them on your eyes for two minutes. Now place them on the sides of your nose. Yes, this area can become inflamed, as well.

Once you dry off your eyes and nose, you are ready to start applying makeup. Of course, your best friend right now is a concealer. The best correctors are the green-tinted ones. These can help neutralize redness.  As you are applying your makeup, skip the foundations and powders. If you have a great beauty balm cream, now is the ideal time to use it, especially one that has a tint to it. Your skin may be dry from any drinking you did and from not getting enough sleep.

One makeup step you must not skip is your eyes. If you can make your eyes look brighter, you will look more rested. Be sure to use an eyeliner and some mascara to give your eyes a wider and more open look.

Add some highlighter onto your cheekbones, along the bridge of your nose and the middle of your forehead.  Finally, add some peachy colored blush and a bold hydrating lipstick. Now look at yourself in the mirror. Can you honestly tell that you had a rough night?


Holiday makeup tips

Makeup rules may change a bit during the holidays.

Now that the holidays are approaching, you  may want to dress a little more daring. If daring isn’t the look you want, you may at least want to spice up your style a tad. You can easily do this with makeup, as well as a little bit of accessories. You can also throw out some of the normal rules during this time, especially when you are heading out to some fun holiday parties.

What rules should you consider remembering? First, don’t stick with the basic rule of matching your makeup with the color of your outfit. Too much of a good thing can make you look to match up with your outfit and tacky instead of flashy and daring. For instance, if you are dressing in a full length gown, keep your makeup low-key. If you are wearing sparkly clothing, don’t wear sparkly eye shadow or body glitter, as well.

Do consider wearing some shimmery eye shadow, if your outfit is low-key. There are a number of options of eye shadows you can shimmer. This can include the basic powders to the creams. This writer loves the shimmer creams for those special occasions.

The ideal place to add the shimmer is right above the iris of your eye and then on toward the outer corner of your eyelid. This will help open up your eyes and make them look more dramatic. You can also apply a small amount of glitter onto your cheeks, over top your blush. However, if you do, this skip the glitter nail polish. Remember too much of a good thing is overkill.

What about your lips? If you choose to use shimmery eye shadow, a neutral color lipstick or lip gloss if your best bet. However, if you aren’t planning on using shimmery eye shadow, you may wish to play up your lips instead of your eyes. You can do this with your favorite shade of red lipstick.

First, you should line your lips with a lip liner that is close to the color of the lipstick.  Next, carefully draw in the lipstick. Set your lips by covering lightly with powder and then reapply another coat of lipstick. Now your lips should have a wow effect all night long.

The last thing you may want to consider is adding some highlighter to your look. Highlighter can act like a skin brighter. This should be applied in a series of lines. One line should be brushed under your eyes, one across each side of your nose and finally one should be brushed along the corners of your chin.

These looks are hard to accomplish. In fact, they only take a few minutes. Yet, they will give you that polished holiday look.   

Look prettier in the morning

Nightly beauty routines that can help you look prettier during the day.

Yes, sleep is important. Sleep gives our bodies and our mind a chance to rest. However, the time in which we are sleeping is also the ideal time to become more beautiful.  All it takes is a little prep time before we crawl into our beds. Here is some of this writer’s favorite beauty before bed tips.

Do you love the look of wavy hair? Yet, are you like most women and have little to no time to style your hair in the mornings? If you are nodding your head in agreement, try this simple tip. Braid your damp hair in some loose braids before crawling into your bed at night. Undo the braids in the morning and presto you have a nice wavy look in the morning that you tamed as much as you need or want.

Do you want to prevent wrinkles? By now, you know, that you can do this while you sleep. This can be done by applying your favorite anti-wrinkle creams and even Frownie patches. These can help stop movement while you sleep. Many women swear that they actually minimize the appearance of wrinkles.

Do you have dry skin? Night is the perfect time to try to repair it with a moisturize lotion. However, remember this rule of thumb if you shower or take a warm bath right before going to bed. The best time to apply lotion is within three minutes of bathing.

Does your hair feel especially dry? Consider applying conditioner or a hair mask on your hair at night when you know you will have in the morning to wash it out, completely.

Is your pale skin bugging you? Do you wish to apply self-tanning lotion or at home spray tan product? Night is the perfect time. However, be sure you are completely dry before crawling into bed.

Finally, if you can, sleep on satin pillow cases. This will help keep your hair smoother, help reduce static in your hair and will help reduce face and eye wrinkles.

Affordable hair conditioner

And it works beautifully too!

Lately, I have been trying to use fewer chemicals on my hair.  So besides cutting back on the number of times that I shampoo within a week, I have also decided to give a more natural conditioner a try.  What is this green conditioner that I speak of?  It is apple cider vinegar—a product that most already have sitting at home.

Apple cider vinegar is typically recommended over distilled vinegar due to the fact that it is less harsh.  Yet it is acidic enough to clean out buildup in the hair and helps to get rid of flakes and dandruff.  Therefore, I figured it would be the ideal conditioner for me to try.

So was I happy with the results?  Right now, I sort of have mixed feelings about it.  Conditioning my hair with the apple cider vinegar definitely made my hair soft and shiny.  However, there was just one problem—the off-putting smell.  The smell was at its worse during the shower—when I was applying the vinegar to my hair.  The salad smell continued to linger even after I had thoroughly rinse the vinegar out of my hair.  Only after I had finish blow-drying my hair did the smell go away. 

Initially, I had thought that things were not so bad.  I could take advantage of all the benefits of apple cider vinegar, and all I had to do was make sure to dry my hair thoroughly before leaving the house.  However, it was not that simple.  Anytime my hair got wet again, the vinegar smell was sure to come back.  It was most obvious after my hair got all sweaty during a routine run on the treadmill.  Even so, I am still going to give the apple cider vinegar another chance.

Fast tips to a healthy glow

Do you have 15 minutes to look great?

Yes, you are in a rush.  Yes, every single minute of your day counts. We all live busy lives. Yet, we all should take at least 15 minutes to look good. Here is how we can do this.

Start with a quick manicure. You can do this by applying one of those several shades of fast drying blends. This writer loves the brand Sally Hansen and she loves the quick dry formulas. Yes, they will really dry in five minutes or less.

The trick is to try not to bump your nails for the next half hour or so.  Yes, you can use your hands and fingers. You just don’t want to bump against them on things. This means you must use the padding of your fingers when you write or put on the rest of your makeup.

After your nails are dried, you can start on your face makeup. All you need to do is apply the basics. This can include: primer, foundation (if needed) and concealer. Once the basics are applied, go straight to the eyes. Yes, the eyes are where you need to put in the most attention.

Remember the eyes are the window to the soul. They are also the part of the face that will get the most attention. First, apply your favorite shade or shades of eye shadow, eye liner and mascara. Yes, those liners and mascara are important to emphasize your eyes. Now add a little bit of blush to the apples of your cheeks and up toward your temple area.

Finally, add a bit of color to your lips, spritz on some perfume and you are ready to go. Check your time. Did it really take you that long? Plus, the more you practice this routine, the less time it will take you to perfect. 

Hair tricks that will help you look younger

Look younger by using these simple hair tricks

Would you like to look younger? Did you know that certain hair styles or tricks can instantly take years off of you? Some of these tricks are so simple to accomplish that you don’t even need a stylist.

The easiest trick is to add a pony tail to your style. You already know that this is a go-to style when you are in a rush or when your hair needs to be washed. However, it is a go to style when you want to look a bit younger, too. However, you can’t just style your hair in any pony-tail. First, stay away from the severe slick back-style pony tails. 

These will just add more years to your look by emphasizing every pore and every wrinkle you have. Instead, go for a soft pony-tail, one that is a bit messy, slightly frizzy and considered a bit on the sexy side. You may even want to go for one that sits at the side of your head, instead of the back.

Skip the center part. Instead, shift your part to the side and consider zigzagging it.  This will create an effortless stylish look. It will also help hide any gray strands or that tale-tale sign that you need to color.

Add some gloss to your hair. This will add shine. Shine is a symbol of youth. You may want to try one of those many at home glazes. Finally, you may want to consider cutting your hair or adding some bangs to your style.  If you go for a cut, consider adding some layers to your hairstyle, too. 

Relieving irritated and sensitive skin

Makeup and home remedy tips

Do you have sensitive skin? Do you have irritated skin? Do you wonder how you can moisturize your sensitive skin and help relieve some of its dryness, without further causing more irritation problems?

First, you could go to a dermatologist. This doctor may advise you to do some smart things as cutting out those hot baths that you love. Yes, hot water will draw the moisture from your body. You should be using warm water instead. You should also not be using lotions and cleansers that contain solvents such as mineral oil or petrolatum. These solvents can strip the oil from your body, too. These doctors may also warn you about using products that contains fragrances and artificial dyes.

You could examine your makeup and your brushes. Do you clean your makeup brushes regularly? These brushes can contain bacteria, which can aggravate sensitive skin. You could even skip the brushes and begin using disposable sponges. These can be thrown out with each use and thus help your skin avoid extra bacteria. What can you do when a blotch does occur from sensitivity? You can simply hide the blotch with some miner wear talc free powder, until it slowly heals.

If you wish to use a home remedy, one of the most beloved remedies for irritated skin is simple milk. Milk can help cure the irritation and help relieve the itchiness associated with it. It can also help balance the skin’s PH balance. One can simply, soak a cloth in warm milk and apply onto the affected area. This can be done once a week or more often, if the area is badly infected.


Turn back the clock with makeup

Makeup tips that can make you look younger.

You know that makeup can help hide your imperfections. Did you also know that using the right makeup and applying it correctly can help you look younger?  All you have to do is follow some simple tips.

First, you must use the right foundation. The right foundation is one that contains ingredients that will help increase collagen such as peptides and vitamin C to help fade age spots. You also want to use a moisturizer on your face.

Apply eye liner correctly. This means you shouldn’t apply it all around your eyes. If you do this, you will help to make your eyes look smaller. What you should do is apply eye liner to your top lashes and to the corners of your inner eye area.

Don’t wear dark lipstick. As we age, our lips will lose some of their plumpness. Dark lipstick will emphasize this fact. Go for more neutral and medium shades of lipstick.

Go easy on the blush. Yes, you may look paler and duller now that you are older. However, the solution is not to add hot pink color to your cheeks. The solution is to turn to warm and rosy blush shades and apply them correctly. They should be applied to the apples of one’s cheeks and then blended upward toward their temples. This will help give one color and add a fuller look to their face.

Check the color of your concealer. Is it white looking? If it is, it is the wrong shade. If a concealer is too light it can cause you to look washed out and make your skin look ashy. You concealer should only be a shade lighter than your own skin, no more.

If you follow these simple steps, your makeup will match your skin tone and you will look younger in minutes.


Pages